Wednesday, 9 November 2016

What is Linux Namespace, Cgroups, Hypervisor, Containers and Docker? How to use Docker?


Today's Modern world keeps talking about "multi tenancy" ( Each user/Customer is a tenant), "virtualization" , dockers, containers, hypervisor etc.. In this post, i will explain these terminologies.

What is virtualization?

In computing, virtualization refers to the act of creating a virtual (rather than actual) version of something, including virtual computer hardware platforms, operating systems, storage devices, and computer network resources.

It allows you to run multiple operating system as virtual machines.Each copy of operating system is installed in to a virtual Machine.


From the above figure, it shows as partitioning one physical server into multiple virtual servers. Each of these virtual servers can run its own operating system and applications, and perform as if it is an individual server.
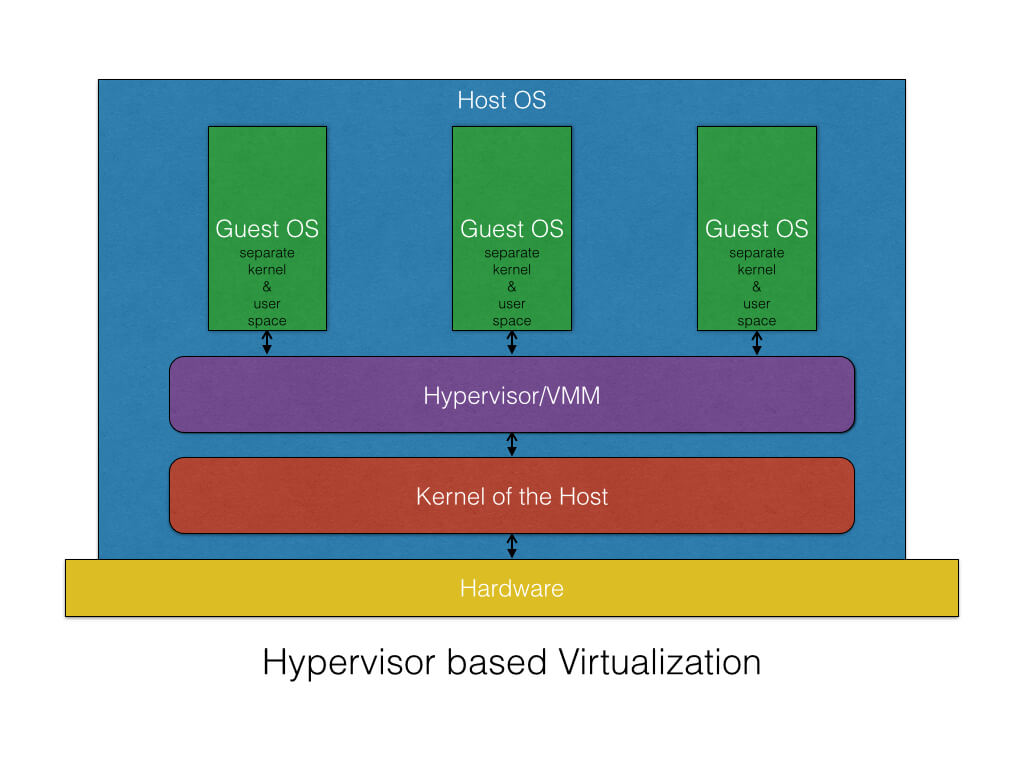

What is Hypervisor?

hypervisor or virtual machine monitor (VMM) is a piece of computer software, firmware or hardware that creates and runs virtual machines

A computer on which a hypervisor runs one or more virtual machines is called a host machine, and each virtual machine is called a guest machine

Multiple instances of a variety of operating systems may share the virtualized hardware resources: for example, LinuxWindows, and OS X instances can all run on a single physical x86 machine. 

This contrasts with operating-system-level virtualization, where all instances (usually called containers) must share a single kernel, though the guest operating systems can differ in user space, such as different Linux distributions with the same kernel.

Hypervisors are often divided between Type 1 and Type 2 hypervisors.

A Type 1 hypervisor (sometimes called a ‘Bare Metal’ hypervisor) runs directly on top of the physical hardware. Each guest operating system runs atop the hypervisor. Xen is perhaps the canonical example. KVM, Xen, or ESXi.


Image result for hypervisor


Type 2 Hypervisor


A Type 2 hypervisor (sometimes called a ‘Hosted’ hypervisor) runs inside an operating system which in turn runs on the physical hardware. Each guest operating system then runs atop the hypervisor. Desktop virtualization systems often work in this manner.  Examples: VMWARE, Oracle Virtual Box etc.

What is Linux Namespace?

Before discussing about Linux Namespace, check out the below question.

How do i provide an isolated view of global resources to a group of processes(tasks).

The Answer is Namespace.

Linux Namespace means - Process Virtualization.  In order words,  makes processes running inside that namespace believe they have their own instance of that resource.

"Def: From Linux article:
Namespaces Wraps global system resources in an abstraction that makes it appear to the processes that they have their own isolated instance of the global resource.

Namespace isolation is the key technology that makes containers possible on Linux. There are six namespaces in Linux:

  • mount: Isolates the filesystems visible to a group of processes, similar to the chroot command.
  • UTS: Isolates host and domain names so that each namespace can have its own. (UTS = Unix Time Sharing)
  • IPC: Isolates System V and POSIX message queue interprocess communication channels. (IPC = InterProcess Communication)
  • PID: Lets processes in different PID namespaces have the same PID. (This is useful in containers, as it lets each container have its own init (PID 1) and allows for easy migration between systems. ) (PID = Process ID)
  • network: Enables each network namespace to have its own view of the network stack, including network devices, IP addresses, routing tables etc.
  • user: Allows a process to have a different UID and GID inside a namespace to what it has outside
Here i would like to present about on Network Namespace, since it been using in Cloud technologies (Such as Openstack).

What is Network Namespace?


Network namespaces allow you to have isolated network environments on a single host.

Each network namespace has its own interfaces and routing table, separated from other namespaces. In addition, processes on your system can be associated with a specific network namespace.
(or)

With network namespaces, you can have different and separate instances of network interfaces and routing tables that operate independent of each other.

The network namespaces provides your own view of the network stack of your system.  In Linux, the namespace concept is supported by “ip netns” command.

Network namespace used in a variety of projects such as Open Stack, Docker

To check if your kernel supports namespaces, run the following commands:

Creating a network namespace is actually quite easy. Just use this command:

ip netns add <new namespace name>

For example, let’s say you wanted to create a namespace called “blue”. You’d use this command:

ip netns add blue

To verify that the network namespace has been created, use this command:

ip netns list

With namespaces, every tenant network traffic and network interfaces is completely isolated from each other as illustrated.
Network Namespaces are powerful constructs in Linux that allows you to create a copy of the TCP/IP network stack


What is Cgroups ?

Cgroups - Called as Control Groups.  As name says, it controls or manages the subsystems  (or processes) in terms of resources.

It is a Linux kernel feature to limit, account, and isolate resource usage (CPU, memory, disk I/O, etc.) of process groups.

From the definition Redhat,
 Cgroups allow you to allocate resources — such as CPU time, system memory, network bandwidth, or combinations of these resources — among user-defined groups of tasks (processes) running on a system. 

You can monitor the cgroups you configure, deny cgroups access to certain resources, and even reconfigure your cgroups dynamically on a running system. The cgconfig (control group config) service can be configured to start up at boot time and reestablish your predefined cgroups, thus making them persistent across reboots 

By using cgroups, system administrators gain fine-grained control over allocating, prioritizing, denying, managing, and monitoring system resources. Hardware resources can be appropriately divided up among tasks and users, increasing overall efficiency.

Source from [https://mairin.wordpress.com/2011/05/13/ideas-for-a-cgroups-ui/]


So this diagram kind of shows how four of the system resources that cgroups can control – CPU, memory, network, and storage I/O – could be cut into slices that are then combined into two groups – the yellow and the purple one – which make up virtual OSes. Say I gave cgroup #1 (yellow) to Sally, and cgroup #2 (purple) to Joe. Whenever Sally starts a process, you could set it to only run on the CPUs that are members of cgroup #1 (via cpuset), at whatever priority level is set for those CPUs (via cpu). It’ll only be able to use as much memory as was allocated to cgroup #1, only be able to use as much network and I/O bandwidth as cgroup #1 is able to use. When Joe starts a process, because he’s part of cgroup #2, he won’t be using the same CPUs as Sally. He may have more or less memory, I/O, and network bandwidth allocated to him.
It’s kind of / sort of like Joe and Sally are using different computers, on the same operating system. Cool, right?


How to Create Control group?

There are a collection of tools available in the libcgroup-tools package, including cgcreate, for example. You can use this tool to create a new cgroup as follows:

cgcreate -g memory,cpu:mysql 
This will create a new cgroup called mysql which has been tied to the memory and cpu subsystems.

What is Container ?

cgroups        : manage resources for groups of processes
namespaces : per process resource isolation


Container is -  Operating system virtualization.

Linux Containers (LXC) is an operating-system-level virtualization method for running multiple isolated Linux systems on a single control host (LXC host). 

It does not provide a virtual machine, but rather provides a virtual environment that has its own CPU, memory, block I/O, network, etc. space and the resource control mechanism. 

Containers which offer an environment as close to possible as the one you'd get from a VM but without the overhead that comes with running a separate kernel and simulating all the hardware.

This is achieved through a combination of kernel security features such as namespaces, mandatory access control and control groups.


Another View ->
hypervisor based virtualization
virtualization of OS containers
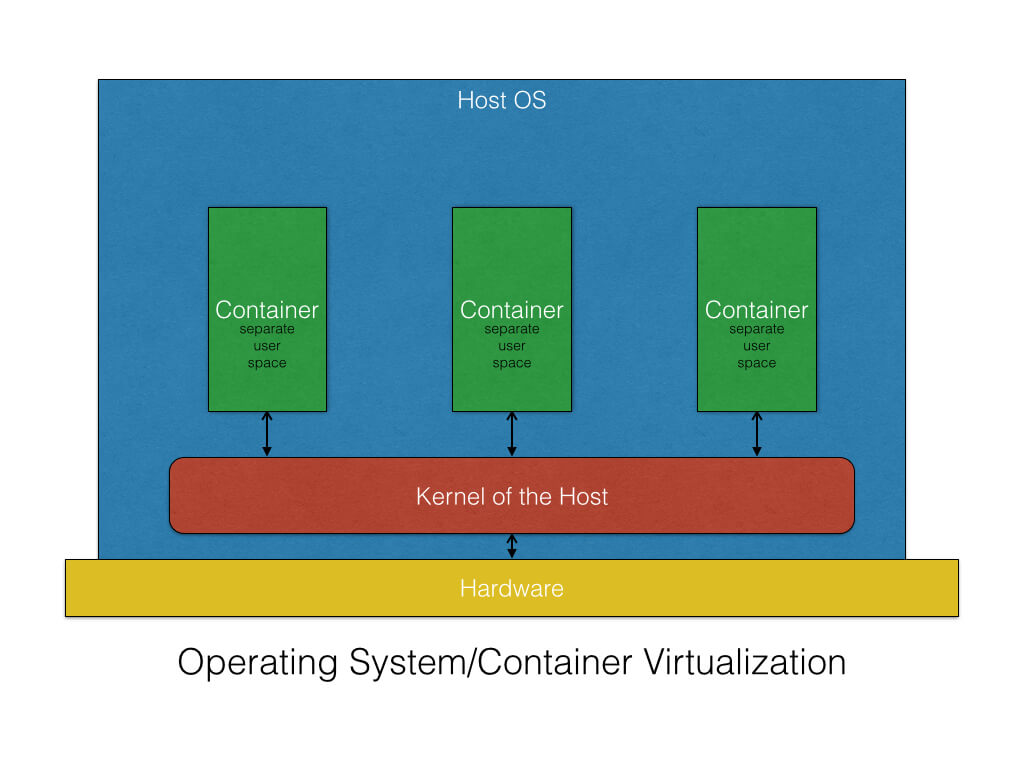
The difference between a container and a full-fledged VM is that all containers share the same kernel of the host system. This gives them the advantage of being very fast with almost 0 performance overhead compared with VMs. They also utilize the different computing resources better because of the shared kernel. However, like everything else, sharing the kernel also has its set of shortcomings.
Type of containers that can be installed on the host should work with the kernel of the host. Hence, you cannot install a Windows container on a Linux host or vice-versa.
Isolation and security -- the isolation between the host and the container is not as strong as hypervisor-based virtualization since all containers share the same kernel of the host
What is Docker?


COMPARING CONTAINERS AND VIRTUAL MACHINES


Containers and virtual machines have similar resource isolation and allocation benefits -- but a different architectural approach allows containers to be more portable and efficient.


VIRTUAL MACHINES CONTAINERS
VIRTUAL MACHINES

Virtual machines include the application, the necessary binaries and libraries, and an entire guest operating system -- all of which can amount to tens of GBs.

CONTAINERS

Containers include the application and all of its dependencies --but share the kernel with other containers, running as isolated processes in user space on the host operating system. Docker containers are not tied to any specific infrastructure: they run on any computer, on any infrastructure, and in any cloud.

Dockers

Docker containers are not tied to any specific infrastructure: they run on any computer, on any infrastructure, and in any cloud.

Docker is able run to different application in a isolated environment on top of one operating system and  yet they don't need all the overhead of an entire operating system.
For Example:
An App that is running Java 7 and at the same time you have a brand new API's taking
advantage of the new capabilities in java 8 and you can run these two side by side
on the exact same machine with our needing install or worried about having multiple
versions of java installed.
 
You can create their own containers that they run inside of it are isolated from each other.

Source from [https://docs.docker.com/engine/understanding-docker/]

Dockers Platform  [  refer the above link for much Information]

Because of the lightweight nature of containers, which run without the extra load of a hypervisor, you can run more containers on a given hardware combination than if you were using virtual machines.
Docker provides tooling and a platform to manage the lifecycle of your containers:
  • Encapsulate your applications (and supporting components) into Docker containers
  • Distribute and ship those containers to your teams for further development and testing
  • Deploy those applications to your production environment, whether it is in a local data center or the Cloud

What is Docker Engine?

Docker Engine is a client-server application with these major components:
  • A server which is a type of long-running program called a daemon process.
  • A REST API which specifies interfaces that programs can use to talk to the daemon and instruct it what to do.
  • A command line interface (CLI) client.
Docker Engine Components Flow
The CLI uses the Docker REST API to control or interact with the Docker daemon through scripting or direct CLI commands. Many other Docker applications use the underlying API and CLI. The daemon creates and manages Docker objects, such as images, containers, networks, and data volumes.

What is Docker’s architecture?

Docker uses a client-server architecture. The Docker client talks to the Docker daemon, which does the heavy lifting of building, running, and distributing your Docker containers. The Docker client and daemon can run on the same system, or you can connect a Docker client to a remote Docker daemon. The Docker client and daemon communicate via sockets or through a REST API.
Docker Architecture Diagram

Docker client:

This is what's running in our machine. It's the docker binary that we interface with when we open a terminal and type $ docker pull or $ docker run. It connects to the docker daemon which does all the heavy-lifting, either in the same host (in the case of Linux) or remotely (in our case, interacting with our VirtualBox VM).

Docker daemon:

This is what does the heavy lifting of building, running, and distributing your Docker containers.

Docker Images:

Docker images are the blueprints for our applications. They are our blueprints for actually building a real instance of them. An image can be an OS like Ubuntu, but it can also be an Ubuntu with your web application and all its necessary packages installed.

Docker Container:

Docker containers are created from docker images, and they are the real instances of our containers/lego bricks. They can be started, run, stopped, deleted, and moved.

Docker Images Vs Docker Container:

If an image is a class, then a container is an instance of a class—a runtime object.
An instance of an image is called container. You have an image, which is a set of layers as you describe. If you start this image, you have a running container of this image. You can have many running containers of the same image.
You can see all your images with docker images whereas you can see your running containers with docker ps (and you can see all containers with docker ps -a).

Docker Hub:

Docker Hub is the official Docker hosted registry that can hold Docker Images. Docker Hub is the official registry

How to install Docker in Ubuntu: 

[ Source from  https://www.digitalocean.com/community/tutorials/how-to-install-and-use-docker-getting-started]

Update the repository with the new addition:
sudo apt-get update
Finally, download and install docker:
sudo apt-get install docker-engine

How To Use Docker

Once you have docker installed, its intuitive usage experience makes it very easy to work with. By now, you shall have the docker daemon running in the background. If not, use the following command to run the docker daemon.
To run the docker daemon:
sudo docker -d &
Usage Syntax:
Using docker (via CLI) consists of passing it a chain of options and commands followed by arguments. Please note that docker needs sudo privileges in order to work.
sudo docker [option] [command] [arguments]
Note: Below instructions and explanations are provided to be used as a guide and to give you an overall idea of using and working with docker. The best way to get familiar with it is practice on a new VPS. Do not be afraid of breaking anything– in fact, do break things! With docker, you can save your progress and continue from there very easily.

Beginning

Let's begin with seeing all available commands docker have.
Ask docker for a list of all available commands:
sudo docker
attach    Attach to a running container
build     Build a container from a Dockerfile
commit    Create a new image from a container's changes
cp        Copy files/folders from the containers filesystem to the host path
diff      Inspect changes on a container's filesystem
events    Get real time events from the server
export    Stream the contents of a container as a tar archive
history   Show the history of an image
images    List images
import    Create a new filesystem image from the contents of a tarball
info      Display system-wide information
insert    Insert a file in an image
inspect   Return low-level information on a container
kill      Kill a running container
load      Load an image from a tar archive
login     Register or Login to the docker registry server
logs      Fetch the logs of a container
port      Lookup the public-facing port which is NAT-ed to PRIVATE_PORT
ps        List containers
pull      Pull an image or a repository from the docker registry server
push      Push an image or a repository to the docker registry server
restart   Restart a running container
rm        Remove one or more containers
rmi       Remove one or more images
run       Run a command in a new container
save      Save an image to a tar archive
search    Search for an image in the docker index
start     Start a stopped container
stop      Stop a running container
tag       Tag an image into a repository
top       Lookup the running processes of a container
version   Show the docker version information
wait      Block until a container stops, then print its exit code
Check out system-wide information and docker version:
# For system-wide information on docker:
sudo docker info

# For docker version:
sudo docker version

Docker represents a company and this company offers a registry of images. 

If you think of how virtualization works, we need to have a disk image that represents the system we are running on.

Docker registry is a registry of already existing images that we can use to run and create containerized application.

There is whole lot of community and whole lot of work that's been done to system.

Docker company supports and maintains this registry and community around it.

How to search for the Images?


  Go to -> https://registry.hub.docker.com
and search for software's (e.g: python). You will get the multiple copies.  And find one that which is required.

Working with Images 

As we have discussed at length, the key to start working with any docker container is using images. There are many freely available images shared across docker image index and the CLI allows simple access to query the image repository and to download new ones.
When you are ready, you can also share your image there as well. See the section on “push” further down for details.
Searching for a docker image:*
# Usage: sudo docker search [image name]
sudo docker search ubuntu
Docker search command allows us to actually go look at that registry and searching for the images that we want  with out needing up a browser.
This will provide you a very long list of all available images matching the query: Ubuntu.
How to search for the images using docker command?

docker search --help:
Suppose we want to search for the 100 popular images, then we can search as 100 stars (popular)
  
docker search -s 100 <Software>  e.g: docker search -s 100 python
What will happen once we find an image that you like?
Downloading (PULLing) an image:
Either when you are building / creating a container or before you do, you will need to have an image present at the host machine where the containers will exist.
Docker has "pull" command, it will go up to the website and grab the image and download to your local machine The format of docker command as:
# Usage: sudo docker pull [image name]
docker pull <software>:tag
If we don't give the tag(version of software), then it will try to download all the versions of the images.
# Usage: sudo docker pull [image name]
sudo docker pull ubuntu
Then it will download all versions of Ubuntu like 12.04, 13.04 etc...
There is a way to download the latest version of software using keyword called "latest"

e.g: sudo docker pull ubuntu:latest
Then docker pull will download the latest version of Ubuntu image


How to check the list of images:
All the images on your system, including the ones you have created by committing (see below for details), can be listed using “images”. This provides a full list of all available ones.
# Example: sudo docker images
sudo docker images

REPOSITORY          TAG                 IMAGE ID            CREATED             VIRTUAL SIZE
my_img              latest              72461793563e        36 seconds ago      128 MB
ubuntu              12.04               8dbd9e392a96        8 months ago        128 MB
ubuntu              latest              8dbd9e392a96        8 months ago        128 MB
ubuntu              precise             8dbd9e392a96        8 months ago        128 MB
ubuntu              12.10               b750fe79269d        8 months ago        175.3 MB
ubuntu              quantal             b750fe79269d        8 months ago        175.3 MB

What needs to be done after downloading the images?

Then play with "run" command.

Creating a New Container

It is currently not possible to create a container without running anything (i.e. commands). To create a new container, you need to use a base image and specify a command to run.
# Usage: sudo docker run [image name] [command to run]
sudo docker run my_img echo "hello"

# To name a container instead of having long IDs
# Usage: sudo docker run -name [name] [image name] [comm.]
sudo docker run -name my_cont_1 my_img echo "hello"
This will output "hello" and you will be right back where you were. (i.e. your host's shell)
As you can not change the command you run after having created a container (hence specifying one during "creation"), it is common practice to use process managers and even custom launch scripts to be able to execute different commands.
How to "run" command in interactive mode?


Usage: sudo docker run -it(interactive) [image name] [command to run on the image]
e.g: sudo docker run -it centOS:latest /bin/bash
The above command runs the centOS image and execute the bash command.  "it" is interactive which takes us to TTY.
What docker will do is: 
It will create the container with that image and executes the bash command.


e.g: docker run -it centos:latest /bin/bash  
bash-4.2$ /cat/redhat-release
 centOS 2.6
Then you can use as centos machine.
 How to exit from the image:
exit 
It runs only one entry point of the command (/bin/bash). Once we exit from the bash, then container stopped.

Working with Containers

When you "run" any process using an image, in return, you will have a container. When the process is notactively running, this container will be a non-running container. Nonetheless, all of them will reside on your system until you remove them via rm command.
Listing all current containers:
By default, you can use the following to list all running containers:
sudo docker ps
To have a list of both running and non-running ones, use:
sudo docker ps -l  
sudo docker ps -a
More on  docker run - Command
This command will create a new container and execute command with in that container . This container will remain until it is explicitly deleted.
A container can be restarted, attached, start or stopped. But we can't change the command that is executed.
Whenever the container is restarted, the command which ran earlier still present always.
docker run -i busybox sh  -> The console may not be seen but we can run the commands. 
Running a container:
When you create a container and it stops (either due to its process ending or you stopping it explicitly), you can use “run” to get the container working again with the same command used to create it.
# Usage: sudo docker run [container ID]
sudo docker run c629b7d70666
Remember how to find the containers? See above section for listing them.
Stopping a container:
To stop a container's process from running:
# Usage: sudo docker stop [container ID]
sudo docker stop c629b7d70666
Saving (committing) a container:
If you would like to save the progress and changes you made with a container, you can use “commit” as explained above to save it as an image.
This command turns your container to an image.
Remember that with docker, commits are cheap. Do not hesitate to use them to create images to save your progress with a container or to roll back when you need (e.g. like snapshots in time).
Removing / Deleting a container:
Using the ID of a container, you can delete one with rm.
# Usage: sudo docker rm [container ID]
sudo docker rm c629b7d70666
docker rm $(dockers ps -aq)  -> To remove all container ID's

There is automatic way of deleting the container after executing the docker command.

docker run -it --rm <image> <command>
e.g: docker run -it --rm busybox sh 

Then check for any dockers exist or not.

e.g: docker ps -a

Committing changes to an image:

As you work with a container and continue to perform actions on it (e.g. download and install software, configure files etc.), to have it keep its state, you need to “commit”. Committing makes sure that everything continues from where they left next time you use one (i.e. an image).
# Usage: sudo docker commit [container ID] [image name]
sudo docker commit 8dbd9e392a96 my_img
Sharing (PUSHing) images:
Although it is a bit early at this moment - in our article, when you have created your own container which you would like to share with the rest of the world, you can use push to have your image listed in the index where everybody can download and use.
Please remember to “commit” all your changes.
# Usage: sudo docker push [username/image name]  
sudo docker push my_username/my_first_image
Note: You need to sign-up at index.docker.io to push images to docker index.
How to share the folders from present working directory of Host Machine and docker container?
Use "-v" option to share folders between host machine and docker
# Usage: 
docker run -it --rm -v [Host Machine :Docker Container Directory] [image Name] [Command]
# Example: 
docker run -it --rm -v /home/muni:/hostdirectory ubuntu /bin/bash
 $ cd /hostdirectory

 $ touch file.txt
 The "file.txt" is shared across the docker container and Host system. But if we verify the permissions of this file  and it would be root.
How to change the permissions of the file which is shared between docker and host system?
                       Use "-u" option to share folders between host machine and docker
# Example: 
docker run -it --rm -v /home/muni:/hostdirectory -u 1000:1000 ubuntu /bin/bash
How to pass the environment variables in dockers?
                     Use "-e" option to pass the environment variables in dockers
# Usage: 
docker run -it --rm -e [ENVIRONMENT VARIABLES] [image Name] [Command]
# Example: 
docker run -it --rm -e MYNAME=MUNI ubuntu /bin/bash
$ echo $MYNAME
MUNI
How to compile the Host system code (or program) using the docker container?
When a host system has deprecated libraries or it doesn't support software's need for compilation (or)
You don't want to install any software in Host system (or ) some time run environment is not matching.
In all above cases, docker shall help to run the program(code) in the container and get the output in the host system.
# Usage: 
docker run -it --rm -v [Host:/docker] -u [permissions] [image] [command] -o [outputfile]
e.g:  I want to compile a program in Go language and display the output in the Host machine.
# Usage: 
docker run -it --rm -v ($pwd):/go -u 1000:1000 golang:latest go build -o Helloworld.out
run ./Helloworld.out in host machine to get output.
How to pass port arguments in run command and run in back ground? 
"-d" is used to run the process in background.
"-p" is used to pass the port arguments.
# Usage: 
docker run -d -p [port number] [image]
# Usage: 
docker run -d -p 80 nginx
Run the nginX on port number 80 in background.

Friday, 2 September 2016

Python Interview Questions

The following python questions are being asked in interviews.

1. What are the Data structures used in python?

   The following are the Data structures used in the python.
  
    1. List []
    2. Dictionary{}
    3. tuples()
    4. sets
   
2. What do you mean by List comprehension in python?

   List Comprehensions are easy way to create new lists
   Common applications are to make new lists where each element is the result of some
   operations applied to each member of another sequence.
  
 List comprehensions example 1:
 
   newlist =[]
   oldlist = [9,8,7,6,5]
    for i in oldlist:
        if (i%2==0) :
           newlist.append(i)

    print newlist
   
    The above example can be written in a single using List comprehension.
   
    newlist = [i for i in oldlist if(i%2 ==0)]

    print newlist
   
output:
[8,6]
   
 List comprehensions example 2:
 
newlist = []
for x in [1,2,3]:
   for y in [3,1,4]:
      if x != y:
        newlist.append((x, y))

(or)
List comphrehension as:

newlist = [(i,j) for i in [1,2,3] for j in [3,1,4] if x!=y]

Output ->
[(1, 3), (1, 4), (2, 3), (2, 1), (2, 4), (3, 1), (3, 4)]

3. What is Lambda or Anonymous function?

Lambda is also called as Anonymous function. Anonymous means "function without a name".
Lambda is one line mini functions which are created on FLY. or
These creates new function objects on fly with out using "DEF" keywords or Function body.

Examples of Lambda:
def fun(a)
  return(a*2)
 
fun(2)

or
fun = lambda a: a*2

fun(2)

or
//Pass the 3 as argument
y =(lambda a: a*2 (3))

print y

4. What is difference between List and Tuple?

Understand the Immutable Types and mutable types.

Mutable means it can be changed , Immutable means it can't be changed.

Mutable types are lists and dictionaries

Immutable types are tuples, int, string.

List can be changed by append or extend or insert action functions.

Whereas in tuples the values can't be changed. That's a reason it can be used as keys in Dictionaries.

a=[1,3,4,5,6,7,8]
a.append(10)
print a   -> [1,3,4,5,6,7,8,10]

a=[1,3,4,5,6,7,8]
b=[11,12,13]
a.extend(b)
print a   -> [1,3,4,5,6,7,8,11,12,13]

a =(1,2,3,4)

Basic Operations in Tuples:
len((1, 2, 3))      3               Length
(1, 2, 3) + (4, 5, 6)      (1, 2, 3, 4, 5, 6)               Concatenation
('Hi!',) * 4       ('Hi!', 'Hi!', 'Hi!', 'Hi!')               Repetition
3 in (1, 2, 3)       True               Membership
for x in (1, 2, 3): print x,       1 2 3               Iteration


5. How to define a class in python?

Class is a collection of objects

Simple Syntax of class:
-----------------------
class Classname:
  < class Variables>      -- Shared by all objects (Class Instances)
 
  < Class methods :>
 
E.g:
 class Base:
    var = 9
   
    # Constructor
    def __init__(self):
       var = 9           -- Unique to the object
       print "constructor is called"
   
    def method1(self):
       print "muni"
   
    def method2(self)
       print "sekhar"
   
    def method3(self):
       self.var = self.var +3   -- Instance variable (unique to objects)
      
if __name__=="main":
   
    obj = base()   // Constructor is called
   
    obj.method1()  // Call the method1
   
6. How to define the private variable in Python Class?

There are two ways to make variables as private in python. 
(_ single underscore (weak Private), "__" double underscore (Strong Private)


> Single underscore  ( _variable) -> weak private, it can accessed outside in the same file.
   But other module will not have access to these variables.

> Double underscore  ( __variable) ->strong private, it can't be accessed outside in the same file.
   Other module will not have access to these variables.

   There is a way to access these varibles. < objectName>._<class name>__<double underscore variable>

Sample Example
=============

class Myclass(object):

    # Weak private variable ( With single Underscore)
    _singleUnderscoreVariable=0

    # Strong private Variable (With Double Underscore)
    __doubleUnderscoreVariable=0

    # Constructor
    def __init__(self):
       Myclass._singleUnderscoreVariable += 1
       Myclass.__doubleUnderscoreVariable +=1

    def printData(self):
       print "Single underscore: %d" % Myclass._singleUnderscoreVariable
       print "Instance variable: %d" % Myclass.__doubleUnderscoreVariable

if __name__ =="__main__":

   # Object 1 Created
   m_object = Myclass()

   # print data
   m_object.printData();

   # single underscore variable can be accessed
   # But it can't be imported
   print m_object._singleUnderscoreVariable

7. How to define the private method in Python Class?

  The main purpose of having private method in python class is to restrict the function
  to import to other modules (files)
 
  This can be done in two ways Single underscore or Double underscore.
 
  Single Underscore ("_")  -> Weak private-> can't be accessed out side the file.
  But it can be accessed outside the class. (Like a protected)
 
  Double Underscore ("__")  -> strong Private. It can't be accessed outside class or File.
  It can be accessed only in class method.

8. What is overriding? How to achieve overriding in python?
Method Overriding concept basically used in the inheritance.  Method Overriding means the parent class method is overridden by the child class.

In other words, both parent class and child class have same method (same name, parameters etc.)

In python, the method overriding is simple. There is no need to use the Keyword called "virtual" as in C++.

Overriding in python is pretty straight forward. Check the below example.

class Base(object):

    def override(self):
        print "Base Class override()"

class Derived(Base):

    def override(self):
        print "Derived class override()"

# Create Base class Object
baseObj = Base()

# Create Derived class Object
derivedObj = Derived()

# Call the base class method using baseObj
baseObj.override()

# Call the Derived class method using derivedObj:
# Derived class is overriding the method of base class
derivedObj.override()

 
9. Explain the memory Management in Python?
 
  The memory in the python is managed by private Heap. The memory manager stores the python objects and data structures in private Heap.
 
  Programmer may not have access to the private Heap. Python also have inbuilt GARBAGE collector.
 
  GARBAGE COLLECTOR works on the algorithm called "REFERENCE COUNTING".
    If the reference count is zero ( or no one refers to the object/variable) then that memory will be recycled and added to the heap.
 
  Good Answer from Stack Over Flow:
 
  How are variables and memory managed in Python?

     Automagically! No, really, you just create an object and the Python Virtual Machine handles the memory needed and where it shall be placed in the memory layout.

  Does it have a stack and a heap and what algorithm is used to manage memory?

    Memory management in Python involves a private heap containing all Python objects and data structures.
    The management of this private heap is ensured internally by the Python memory manager.
    The Python memory manager has different components which deal with various dynamic storage management aspects, like sharing, segmentation, preallocation or caching.
    The algorithm used for garbage collecting is called Reference counting. That is the Python VM keeps an internal journal of how many references refer to an object, and automatically garbage collects it when there are no more references referring to it. 


10. What is Constructor? How to declare constructor in class?

Constructor is used to initialize the object data members of a class.
Constructors can be overloaded , it means zero argument constructor, one argument constructor, two argument constructor etc...


Constructor is called during object creation.

class Base:
 
  def __init__(self):
    print " base class Constructor is called"

 
baseObj = Base()   # Zero Argument or Default constructor
#baseObj = Base(1) # One  Argument constructor


11.  How to share global variables across modules in python?

The global variables can be shared across the modules using "IMPORT"

 "import" the module and access the variable using the <ModuleName>.<variableName>

  The efficient way of doing as.  <Source from Python documentation>  


The canonical way to share information across modules within a single program is to create a special module (often called config or cfg).   Just import the config module in all modules of your application; the module then becomes available as a global name.  Because there is only one instance of each module, any changes made to the module object get reflected everywhere.
 

For example:
  

config.py:

x = 0   # Default value of the 'x' configuration setting (Global variable)
mod.py:

import config
config.x = 1


main.py:

import config
import mod
print config.x


12. Explain about Python is a call by reference or Call by value?

Python is neither Call by reference or Call by value.

Everything in python is a object. We can call it as CALL-BY-OBJECT or CALL-BY-OBJECT Reference.

Check out the below examples for Better Understanding:

Immutable Types are String, Int, tuples.
Mutable Types are List, dictionaries.

Example 1:  < Source from Stack Overflow>

If you are passing a variable, then it's pass by value,
which means the changes made to the variable within the function are local to that function and
hence won't be reflected globally. This is more of a 'C/C++' like behavior.

def stringFunc(testString):
    testString="New_Value"
    print "Inside function" % testString

String_Old="Old_Value"
stringFunc(String_Old)
print "Outside function" % String_Old


Output: Inside function New_Value
             Outside function Old_Value

       
Example 2:

If you are passing the variables packed inside a mutable object, like a list or dictionaries
then the changes made to the object are reflected globally as long as the object is not re-assigned.

def changelist( mylist ):
   mylist2=['a'];
   mylist.append(mylist2);
   print "values inside the function: ", mylist
   return

mylist = [1,2,3];
changelist( mylist );
print "values outside the function: ", mylist


O/P:

values inside the function:  [1, 2, 3, ['a']]
values outside the function:  [1, 2, 3, ['a']]


Example 3:

Now consider the case where the object is re-assigned.
In this case, the object refers to a new memory location which is local to the function in
which this happens and hence not reflected globally.

def changelist( mylist ):
   mylist=['a'];
   print "values inside the function: ", mylist
   return

mylist = [1,2,3];
changelist( mylist );
print "values outside the function: ", mylist


O/P:

values inside the function:  ['a']
values outside the function:  [1, 2, 3]


Note:
     If you want to be able to change your values with a function call, what you need is a mutable object (List or Dictionaries).

Interesting Example:

test_string = 'Muni'

first_list = []
first_list.append(test_string)

second_list = first_list
second_list.append('Output String')
test_string = 'Reddy'

print (test_string, first_list, second_list)


Output->
Reddy, ['Muni', 'Output String'], ['Muni', 'Output String']

From the above example it is evident that :
Assignment between lists (second_list = first_list) does not create a new object. Rather, both lists are simply bound to the same object.
As a result, the string object and list object are still the only objects that have been created by the interpreter.

This brings us to an important point: there are actually two kinds of objects in Python. A mutable object exhibits time-varying behavior.
Changes to a mutable object are visible through all names bound to it.
Python's lists are an example of mutable objects. An immutable object does not exhibit time-varying behavior.


13. How to pass list,  tuples and dictionaries as arguments in the functions (Methods)?
  
List can be passed like a normal variable (e.g: arg)
Tuples can be passed as single star (*)  (e.g: *args)
Dictionaries can be passed as double star (**) (e.g: **kwargs)

Check the examples below:

List:
------
def listFunc(arg):
   print arg

#List Variable
listVar = [1,2,3,4,5]

listFunc(listVar)

Tuples:
---------
def tuplesfunc(*args):
   print args

#Tuple Variable
tupleVar = (1,2,3,4)

tuplesfunc(*tupleVar)

# or
tuplesfunc(1,2,3,4,5)


Output:
(1, 2, 3, 4)
(1, 2, 3, 4, 5)


Dictionaries:
---------------
def dictFunc(**kwargs):
   print kwargs


#Dictionary Variable
DictVar =  {'student_name': 'muni', 'school_name' : 'SAI', 'ID':2}

dictFunc(**DictVar)

# or

dictFunc(ID=1, school_name='sai', student_name='muni')

output:
{'student_name': 'muni', 'school_name': 'SAI', 'ID': 2}
{'student_name': 'muni', 'ID': 1, 'school_name': 'sai'} 

How to use all in single function?

Order of using *args **kwargs and formal args

If you want to use all three of these in functions then the order is
some_func(fargs,*args,**kwargs)

14. What is Split() and Join() Methods in Python?


If you want to use all three of these in functions then 

Split()  - Returns a list by seperating the elements based on the delimiter.  (Returns List)
-------
Example:
testString = "This,is,the,test,string"
testString.split(',')

Output:
['This', 'is', 'the', 'test', 'string']

Join()
------
str.Join() - Method returns a string This method returns a string.
Which is the concatenation of the strings in the sequence seq.
The separator between elements is the string providing this method.

e.x:
"".join(testString)

Output-> 'This,is,the,test,string'


e.x:
"-".join(testString)
Output-> 'T-h-i-s-,-i-s-,-t-h-e-,-t-e-s-t-,-s-t-r-i-n-g'


Simple Problem:

Take a string testString="Iam,the,best,person" as input and generate output as  Iam-the-best-person

testString="Iam,the,best,person"
output = "-".join((testString.split(",")))
print output

Saturday, 21 May 2016

Python Object Programming Tips

----------------------------------------
Object Programming in python
----------------------------------------
Every thing in python is objects.

Class is collection of objects. But in python class is also an object of type.
Class contains data and methods.

Generally class contains constructor, methods, data. In python every method
of class must have first parameter as self.

Self -> It refers to object. Self is nothing but place holder of an object.
----------------------------------------
Constructor method in a class:
----------------------------------------
def __init__(self)  
------------------------
Types of variables
------------------------
There are two kinds of variables used in class :
> Instance variables (or object variables):
------------------------------------------------------
   Each object will have own copy of variable and the value is different across objects.

> class variables:
    --------------------
The same variable is shared across all objects. The value is common for all the objects.

How to create simple class?
------------------------------------
class Firstclass(object):

    # Constructor
    def __init__(self):
      print "Constructor is called"

if __name__ =="__main__":

   # Create the object
   # Object is created and constructor is called
   obj = Firstclass()

----------------------------------------------------------------
How to write simple class with Instance Variable?
----------------------------------------------------------------
class Firstclass(object):

    def __init__(self, x):
       self.instance_var = x

    def printCounter(self):
       print self.instance_var

if __name__ =="__main__":

   # Object 1 Created
   object1 = Firstclass(30)

   object1.printCounter()

   # Object 2 Created
   object2 = Firstclass(40)
   object2.printCounter()
-------------------------------------------------------------------
Simple Class with class variable, instance_variable
-------------------------------------------------------------------
class Firstclass(object):

    # class variable
    shared_variable = 0

    def __init__(self, x):
       # instance variable
       self.instance_var = x
       Firstclass.shared_variable += 1

    def printCounter(self):
       print "Class variable: %d" % Firstclass.shared_variable
       print "Instance variable: %d" % self.instance_var

if __name__ =="__main__":

   # Object 1 Created
   object1 = Firstclass(30)

   object1.printCounter()

   # Object 2 Created
   object2 = Firstclass(40)

Output:  The class variable is shared across objects.
---------
Class variable: 1
Instance variable: 30
Class variable: 2
Instance variable: 40

How to make private variables in class?
==============================
There are two ways to make variables as private in python.
Python using the name mangling to make the variables as private.

> Single underscore  ( _variable) ->weak private, it can accessed outside in the same file.
   But other module will not have access to these variables.

> Double underscore  ( __variable) ->strong private, it can't be accessed outside in the same file.
   Other module will not have access to these variables.

   There is a way to access these varibles. < objectName>._<class name>__<double underscore variable>

Sample Example
=============

class Myclass(object):

    # Weak private variable ( With single Underscore)
    _singleUnderscoreVariable=0

    # Strong private Variable (With Double Underscore)
    __doubleUnderscoreVariable=0


    def __init__(self):
       Myclass._singleUnderscoreVariable += 1
       Myclass.__doubleUnderscoreVariable +=1

    def printData(self):
       print "Single underscore: %d" % Myclass._singleUnderscoreVariable
       print "Instance variable: %d" % Myclass.__doubleUnderscoreVariable

if __name__ =="__main__":

   # Object 1 Created
   m_object = Myclass()

   # print data
   m_object.printData();

   # single underscore variable can be accessed
   # But it can't be imported
   print m_object._singleUnderscoreVariable
-------------------------------------------------------------
What is Static Method and Class Method in Python
---------------------------------------------------------------

-> Class method
functions defined inside class shall use the class rather than object.
But with class method, you could write instead:
There is a subtle performance benefit. If you refer to the full class name in a static method,
the Python interpreter has to first look up the local variables, not finding it there, and then look up the global variables.
With a class method, cls would be found in the local variables, so there is no need to look up the globals.

class Smoothie(object):

    YOGURT = 1
    STRAWBERRY = 2
    BANANA = 4
    MANGO = 8

    @staticmethod
    def blend(*mixes):
        return sum(mixes) / len(mixes)

    @classmethod
    def eternal_sunshine(cls):
        return cls.blend(cls.YOGURT, cls.STRAWBERRY, cls.BANANA)

    @classmethod
    def mango_lassi(cls):
         return cls.blend(cls.YOGURT, cls.MANGO)

if __name__ =="__main__":

   s = Smoothie()
   print s.eternal_sunshine()
   print s.mango_lassi()
   print Smoothie.mango_lassi()

---------------------
-> Static method
----------------------
Some times, functions defined inside class may not use the object. Such functions are called as Static Functions.
Static functions will not refer any class attributes.
static methods do not use per-instance object states, but they implement functionality grouped as part of the class.

class Smoothie(object):

    YOGURT = 1
    STRAWBERRY = 2
    BANANA = 4
    MANGO = 8

    @staticmethod
    def blend(*mixes):
        return sum(mixes) / len(mixes)

    @staticmethod
    def eternal_sunshine():
        return Smoothie.blend(
            Smoothie.YOGURT, Smoothie.STRAWBERRY,
            Smoothie.BANANA)

    @staticmethod
    def mango_lassi():
        return Smoothie.blend(
            Smoothie.YOGURT, Smoothie.MANGO)

if __name__ =="__main__":

   s = Smoothie()
   print s.eternal_sunshine()

   print Smoothie.eternal_sunshine()

Here you can call the static function using Object or with the class name.

========
Inheritance
========
Like C++, python also has inheritance. A class can inherit the properties of another class.

syntax:

class parent(object):  -> Parent class is also called as Super class
   pass

class child(parent):     -> Child class is also called as sub class
   pass
----------------------------------------
Simple Program of Inheritance
----------------------------------------
Implict Inheritance: implicit actions that happen when you define a function in the parent, but not in the child.

class Animal(object):

   def __init__(self):
      print " I am in Animal (Parent) Class"

   def printData(self):
      print " I am in Base Class Print"

#inherited
class Bear(Animal):

   def __init__(self):
      print " I am in Bear Class"

if __name__ =="__main__":

   # Create Lion Object
   animal_object = Animal()

   # Create Lion Object
   lion_object = Bear()

   animal_object.printData();
   lion_object.printData();

----------
Output:
-----------
I am in Animal (Parent) Class
 I am in Bear Class
 I am in Base Class Print
 I am in Base Class Print

------------------------
override Explicitly
-----------------------
The problem with having functions called implicitly is sometimes you want the child to behave differently.
 In this case you want to override the function in the child, effectively replacing the functionality.
To do this just define a function with the same name in Child. Here's an example:

class Animal(object):

   def __init__(self):
      print " I am in Animal (Parent) Class"

   def printData(self):
      print " I am in Base Class Print"

#inherited
class Bear(Animal):

   def __init__(self):
      print " I am in Bear Class"

   def printData(self):
      print " I am in Child Class"

if __name__ =="__main__":

   # Create Bear Object
   Bear_object = Bear()

   # print data  of bear
   Bear_object.printData();

   # Create Animal Object
   Animal_object = Animal()
----------
Output:
----------
 I am in Bear Class
 I am in Bear Print Class
 I am in Animal (Parent) Class
 I am in Base Class Print

--------------------------------------------------------------------
How to call the parent method inside the child class  (One kind of Inheritance)
--------------------------------------------------------------------
Super () -> Super key word can be used to call the parent class constructor or method.

super(<present class Name>, self). <method>

in Python 3: super().<method>

By Using the Super() keyword : Multiple inheritance is when you define a class that inherits from one or more classes, like this:

class derivered (parent1, parent2)
  pass

The common properties of two classes shall be inherited twice in the child class, and in python using super() keyword can be avoided.

To do this Python uses "method resolution order" (MRO) and an algorithm called C3 to get it straight.

Because the MRO is complex and a well-defined algorithm is used, Python can't leave it to you to get the MRO right.
Instead, Python gives you the super() function, which handles all of this for you in the places that you need the altering type of actions as I did in Child.altered.
With super() you don't have to worry about getting this right, and Python will find the right function for you.

-----------------------
Sample Program
-----------------------

class Animal(object):

   def __init__(self):
      print " I am in Animal (Parent) Class"

   def alterData(self):
      print "parent class alterted"

class Bear(Animal):

   def __init__(self):
      print " I am in Bear Class"
      # call the parent class constructor
      super(Bear, self ).__init__()

   def alterData(self):
      print "Child class alterted"
      # call the parent class constructor
      super(Bear, self ).alterData()

if __name__ =="__main__":

   Bear_object = Bear()
   Bear_object.alterData();

----------
Output :
---------
I am in Bear Class
 I am in Animal (Parent) Class
Child class alterted
parent class alterted
-----------------------------------------------------------------------
How to solve the Multiple inheritance Problem in Python:
-----------------------------------------------------------------------
Solution: Super keyword and it also used "method resolution order"

class A:
    def m(self):
        print("m of A called")

class B(A):
    def m(self):
        print("m of B called")
        super().m()
 
class C(A):
    def m(self):
        print("m of C called")
        super().m()

class D(B,C):
    def m(self):
        print("m of D called")
        super().m()

if __name__ =="__main__":
   obj = D()
   obj.m()
---------
Output:
m of D called
m of B called
m of C called
m of A called

The super function is often used when instances are initialized with the __init__ method:

class A:
    def __init__(self):
        print("A.__init__")

class B(A):
    def __init__(self):
        print("B.__init__")
        super().__init__()
 
class C(A):
    def __init__(self):
        print("C.__init__")
        super().__init__()


class D(B,C):
    def __init__(self):
        print("D.__init__")
        super().__init__()

if __name__ =="__main__":
   obj = D()
   obj.m()

   print obj.mro
-----------
Output:
------------
it uses the so-called method resolution order(MRO). It is based on the "C3 superclass linearisation" algorithm
  >>> d = D()
D.__init__
B.__init__
C.__init__
A.__init__

>>> c = C()
C.__init__
A.__init__
>>> b = B()
B.__init__
A.__init__
>>> a = A()
A.__init__

------------------
Composition:
------------------
Having some other class inside another class can be termed as composition. It C++ terms, it owns other class instance.
If the main class object destroys, the other object will be destroyed.

class Other(object):

    def override(self):
        print "OTHER override()"

    def implicit(self):
        print "OTHER implicit()"

    def altered(self):
        print "OTHER altered()"

class Child(object):

    def __init__(self):
        #other Class instance is created.
        self.other = Other()

    def implicit(self):
        self.other.implicit()

    def override(self):
        print "CHILD override()"

    def altered(self):
        print "CHILD, BEFORE OTHER altered()"
        self.other.altered()
        print "CHILD, AFTER OTHER altered()"

son = Child()
son.implicit()
son.override()
son.altered()


Thursday, 14 April 2016

Python - Basics- Learn the Python with Examples

In this post, you can find the basics of python.

Run "python" from any Linux terminal (or shell) and practice all examples mentioned below.

-------------
Operations:
--------------

+, -, %, *

2**3 = 2 power 3 = 8

--------
Varibles
--------

Variables is used to store the values.

x=6
y=8

print (x+y)


How to read from keyboard
-------------------------

x=input("enter the Number here ')

print x


Modules and functions
----------------------

x=abs(16)

y=pow(2)

How import to module
=================

import math

The respective module can be accessed by using <modulename>.function

math.floor(18.7) = 18

-------
Strings
========

strings can be stored as " " or ' '

But if there is a string like 'he's muni' -> Error

to avoid these kind of issues then use "he's muni"

Escape Character (\)
-------------------
'he\'s muni' -> it is going to escape next character.

another example
'bucky said, "hey now " to me' -> Solution is: 'bucky said, \"hey now\" to me'

Joining Strings or Concatenation of strings (+)
============================================

a= "muni"
b= "sekhar"

print a + b => munisekhar

'+' sign is used to concatenate the string or Join the strings.


How to concatenate the string and integer
-----------------------------------------

num = 18
print "hello world " + num  -> Will lead in to error.

Since the integer can be concatenate with the string, so we need to convert
the integer in to string.

1 way : str(num)  -> convert num to string.

print "hello world" + str(num)

2nd way: `num`

print "hello world" + `num`

3rd way: repr(num)

print "hello world" + repr(num)


Difference between raw_input vs input
-------------------------------------

raw_input-> Generally used for string. It takes input and converts in to string

input -> Generally used for math(numbers), it can't be used for strings

ex:

bucky = input("Enter the number")
print bucky

>> After execute: Enter the number
>>> muni

--------> lead to error.

Correct way of doing is:
-----------------------
bucky = raw_input("Enter the number")
print bucky

Enter the number
muni

output : muni

=====================
Sequences and Lists
=====================


The most basic datastructure in python is sequence - Each element in a sequence is
assigned with number - It's position or index.
index starts from zero..

The list is a most versatile datatype available in Python which can be written as a list of
comma-separated values (items) between square brackets.
Important thing about a list is that items in a list need not be of the same type.

lists:
-----

list1 = ["muni", "sekhar", 12, 34]

print list1[0]

output: muni

print list[3]

output: 34

How to print the end of the list: It always start from -1.
---------------------------------
print list[-1]  

output: 34

strings indexing
-----------------

str = "muni"

print str[0]   -> m
      str[1]   -> u


==========
slicing
=========

slicing can be done using ':' (colon) operator

example = [0,1,2,3 4,5,6,7,8, 9]

print example[0:4]

output: 0,1,2,3

It explains as include start of the element and print before the end (Here 4 is not included).

example = [0,1,2,3 4,5,6,7,8, 9]

print example[1:9]

[1,2,3,4,5,6,7,8]

How to include the last element
-------------------------------
print example[1:10]

or

print example[1:]

[1,2,3,4,5,6,7,8,9]


print example[:9] = [0,1,2,3,4,5,6,7,8,9]


How to print the element by adding 2
-------------------------------------

print example[1:9:2]  -> it increment every digit by 2.

[1,3,5,7]


print example[-5:9:2]  -> it increment every digit by 2.

[5,7]

Last digit is -1 i.e. 9

print example[-1:-4:-2]  -> it increment every digit by 2.

[9,7]

Double colon Operator
----------------------

example[::-2]
[9, 7, 5, 3, 1]

example[::2]
[0, 2, 4, 6, 8]

===================
Editing Sequencing
===================

The list can be concatenated using '+' operator

list1 = [1,2,3,4]
list2 = [5,6,7,8]

list 3 = list1 + list2

print list3

output : [1,2,3,4,5,6,7,8]

Mutiplication
--------------
num= 20

print num*2

Output -> 40

Double the list (repeat the number)
------------------------------------

num = [20]
print num*2

output -> [20,20]


list3*2 = [[1,2,3,4,5,6,7,8, 1,2,3,4,5,6,7,8]

===================
Using "in" Keyword
===================
"in" keyword is used to check whether the value or character present in the
list or string.

example 1:
---------

name = "muni"

if('r' in name) :
print "true"
else :
print "false"

->
Output : false

name = "muni"
if('m' in name):
  print "true"
else:
  print "false"

->
Output : true

example 2:

list = [1,2,3,4,5,6,7,8,9]
if(10 in list):
  print "true"
else:
  print "false"

->
Output : false

====================================
Some of the Useful List Functions
====================================

list1 = [1,2,3,4,5,6,7,8]

length function
----------------

print len(list1)

->
Output : 8

Get the Maxium value of the list
--------------------------------
print max(list1)

->
Output : 8

Get the Minimum value of the list
--------------------------------
print min(list1)

->
Output : 1

Change the List sequence number to different one
-------------------------------------------------

list1[3] = 10

print list1

->
Output : [1,2,3,10,5,6,7,8]

How to del particular number in a list(Use del keyword)
-------------------------------------------------------

del list1[3]

print list1

->
Output : [1,2,3,5,6,7,8]

-----------------------------
Convert the string in to list
-----------------------------

str = "bucky"

print list(str)

output:

['b','u', 'c','k','y']

===============
Slicing Lists
===============

example = list("bucket")

print example

Output->
['b', 'u', 'c', 'k', 'e', 't']

Append or replace the sequence of strings
==========================================
The below will replace letters from index=3 onwards

example[3:] = list("munisekhar")

print example

['b', 'u', 'c', 'm', 'u', 'n', 'i', 's', 'e', 'k', 'h', 'a', 'r']


Appending the list
===================

Below example append the list from position 1 to after 1

example = [0,1,2,3,4,5,6,7]

example[1:1] =[3,3,3]

print example

->
Output = [0,3,3,3,1,2,3,4,5,6,7]


example = [0,1,2,3,4,5,6,7]

example[2:4] = [10,11,12]

print example

->
Output = [0,1,10,11,12,4,5,6,7]


How to delete the list elements using Slicing operator
======================================================

example = [0,1,2,3,4,5,6,7]

example[1:5]   means starts from 1 to 4 (before 5)

example [1:5] = []

print example

->
Output = [0,5,6,7]

=========================
Introduction to methods
==========================

object.actionfunction(arguments)

for example:

myface.punch(hand) -> myface is the object
                     punch is the action
                     hand is the argument.


fruitslist = ['apples', 'jackfruit', 'banana', 'guava']

append
-------
is used to add the 'orange' string at the end of the list.
------
fruitslist.append('orange')

->
output:
>>> fruitslist = ['apples', 'jackfruit', 'banana', 'guava']
>>> fruitslist.append('orange')
>>> print fruitslist
['apples', 'jackfruit', 'banana', 'guava', 'orange']

-----
count  : How many times the element (string) present in the list.
-----
fruitslist.count('apples')

-------
Output
->
1

--------
extend
--------
one = [1,2,3]
two = [4,5,6]

one.extend(two)

print one

output->
The extend will take two list as a paramter and added to the one list.
[1,2,3,4,5,6]


Some more functions
-------------------

say =['muni', 'sekhar', 'reddy', 'a']

index  : to get the exact index number
======
say.index('reddy')

print say

output
->
-------
2

------
insert  : you can insert the data at particular index of list
------
say.insert(2, 'rishi')

print say

->
output:
['muni', 'sekhar', 'rishi', 'reddy', 'a']

----
pop  : remove the data using index
----

say.pop(2)

print say

->
output:
['muni', 'sekhar', 'reddy', 'a']

-------
remove  : pass the exact data to remove from the list
-------

say.remove('a')

print say

->
output:
['muni', 'sekhar', 'reddy']

--------
reverse  : reverser the list
--------
say.reverse()

->
output:
['reddy', 'sekhar', 'muni']

==================
Sort and Tuples
==================

Sort -> Using sort function, the list can be sorted.

new = [33, 5, 4,66,9,10]

new.sort()

print new

->
output:
[4,5,9,10,33,66]


String can be sorted using "sorted" keyword
============================================
name="muni"
sorted(name)

->
output:
['i','n','m','u']

-------

Tuples
======

For tuples , we can add or insert or modify the values in the tuples.

But whereas in list, the values can be modified.

buckytuple = (22,33,44,56)

bucky[2] = 44

tuples can't be modified.


================
String n Stuff
================

There are many useful string techniques, some of them are:

How to add your add content in the strings  (Using % operator)
------------------------------------------

bucky = " hey there %s, How are %s"

declare a tuple
----
var = ('ramu', 'sita')

The own content can be added using "%" operator.

print bucky % var

->
output:
hey there ramu, How are sita
-----------------------------------------
The same can be changed as:

varc = ('ra', 'si')

print bucky % varc

->
output:
hey there ra, How are si


Find Method for strings
========================

bucky = "are you there muni" , i am in cgiri"

bucky.find('muni')
->
output  : 14

'm' is at position of 14.


Some more String methods:
=========================

join the strings -> Using join keyword
----------------
sequence = ['hey' , 'there', 'boss']
glue = 'hoss'

glue.join(sequence)

output->
heyhosstherehossbosshoss

How to lower case the string (Using lower keyword)
----------------------------

randstr = "I am WORK women"
randstr.lower()

output->
i am work women

How to replace a string ( Using replace keyword)
------------------------
samplestring = " I am munisekhar Reddy"

samplestring.replace('Reddy', 'naidu')

Output-> I am munisekhar naidu


DICTIONARY
===========

dictionary is collection of keys and values.

" The values can be stored against the words"

syntax:
sampledictinary = {key:values}

sampledictionary = {'dad':'munireddy', 'mother':'aruna', 'grandmother':'gangamma'}

sampledictionary['dad']

output-> 'munireddy'

Some of the useful methods of dictonaries
------------------------------------------

clear method
-----

sampledictionary.clear()

clear the dictionary content and make the dictionary as empty.

output->
{}

Copy the dictionary
--------------------
anotherdict=sampledictionary.copy()

output->
anotherdict = {dad':'munireddy', 'mother':'aruna', 'grandmother':'gangamma'}

Check the dictonary has key or not
----------------------------------

sampledictionary.has_key('sister')

output->
false

sampledictionary.has_key('dad')

output->
true

=============
IF statement
=============

syntax:

if() :  (After end of if there is colon operator needs to give here)
  <indent> print sample
else :
  <indent> print else.


Sample example->

tuner = "blackcolour"
if(tuner == "blackcolor"):
   print " I am in IF loop"
else :
   print " I am in else loop"

=======================
IF/ELIF/ELSE statement
=======================
tuner = "blackcolour"

if(tuner == "blackcolour"):
  print " I am in IF loop"
elif (tuner == "redcolour"):
  print " I am in  red loop"
elif (tuner == "yellow"):
  print " i am in Yellow"
else :
  print " I am in else loop

=====================
NESTED IF statements
=====================
tuner = "redcolour"
animal = "pig"

if(tuner == "blackcolour"):
  print " I am in IF loop"

  /* Nested IF statements, IF statements within IF */
  if animal == pig:
     print " i am in pig"
  else :
     print " i am not pig"

elif (tuner == "redcolour"):
  print " I am in  red loop"

elif (tuner == "yellow"):
  print " i am in Yellow"

else :
  print " I am in else loop


=======================
Comparision Statements
======================

is and in statements in IF statements
-------------------------------------

in operator   ( It checks whether that element is present in the string)
------------

example = "pizza"

if 'p' in example:
  print true
else :
  print false

Output-> true.


is operator
------------

Whether it is same object or not.

list1 = [120,20]
list2=[120,20]

if (list1 is list2):
  print true
else :
  print false

Output-> false

since it is not same object.

example 2
----
list1 = list2= [120,20]
if (list1 is list2):
  print true
else :
  print false

Output-> true

=====================
And and Or operators
=====================
and -> Used for Range operation checks
or  -> either one is true


e.g:

example =3

if example<4 and example<6 :
  print "The AND condition is true"
elif example>19 or example<23:
  print "The OR condition is true"
else:
  print "nothing is matching"

====================
FOR and WHILE Loops
====================

While Loop example
------------------

b=1
while b<10:
  print "count:" + b
  b= b+1

Output-> count: 1,2 3,4 5,6,7,8,9


For Loop example
-----------------

fruitlist= ["milk", "juice ","butter"]
for food in fruitlist:
  print "I want " + food

Note: food will be pointing to the staring element of the list.
      There is no need to assigment of this variable also no need of increment.


Output->

I want milk
I want juice
I want butter

==================================
Infinite Loops and break statement
===================================

Let's have a dictionary which stores the values against the keys.

ages = {'dad':24, 'mom':45, 'sister':18}

for item in ages:
 print item

Output->
  item will be the keys of the dictionary.

dad
mom
sister


Then How to get the values of the dictionary
--------------------------------------------

ages = {'dad':24, 'mom':45, 'sister':18}

for item in ages
 print item, ages[item]

Output:

  dad    24
  mom    45
  sister 18
---------------
Infinite Loops
--------------

while 1:
  num=input("Enter the number")
  if num == 5:
    print "exit"
    break


example 2:
----------

while 1:
  name= raw_input("Enter the name")
  if(name =='quit'):
    break
 
Output:
Enter the name muni
Enter the name sekhar
Enter the name reddy
Enter the name quit


======================
Building functions
======================

How to write your own functions:

Use the keyword as "def" before the function name (def is called as definition).

function syntax:

def funcname(<parameters>):
  do some logic
  return parmeter

---------
example 1:
----------
def firstfunction(x):
 return "I want " +x

print firstfunction('cofee')
print firstfunction('Tea')
print firstfunction('milk')

Output->
I want cofee
I want Tea
I want milk


---------
example 2:
----------

def firstfunction(x):
 return  x+10

print firstfunction(10)
print firstfunction(20)
print firstfunction(30)

Output->
I want 10
I want 20
I want 30


==============================
Default parameters in function
==============================

def samplefunc(first= 'muni', last='sekhar'):
  print '%s %s' % (first, last)

firstfunction()

Output-> muni sekhar

In the above example, there are default values are assigned to the parameters.

function is called with out arguments. It prints the default values.

ex 2:
----
one can also override the default parameters as:

def samplefunc(first= 'muni', last='sekhar'):
  print '%s %s' % (first, last)

firstfunction('raj', 'reddy')

Output-> raj reddy


ex 3:
----
You can override the one parameter as:

def samplefunc(first= 'muni', last='sekhar'):
  print '%s %s' % (first, last)

firstfunction(last='reddy')

Output-> muni reddy

=====================
Multiple arguments
=====================

How to accept multiple arguments using single variable in a function

Use asterik (*)

ex 1:
-----

def samplefunc(*food):
  print food

samplefunc('apples', 'banana', 'cherrys')

Output->
(apples', 'banana', 'cherrys',)

Here the '*' infront of variable accept the multiple parameters (as tuple).


ex 2:
-----

def samplefunc(name, *ages):
  print name
  print ages

samplefunc('muni', (22,33,44,55))

Output->
muni, ((22, 33,44,55),)


=============================================
How to convert the parameters as dictionaries
==============================================

Double asterik (**) will do the magic.

example 1:
---------

def cart(**items):
  print items


cart(apple=40, grapes=65, strawberryies=89)

output-> Convert in to dictionaries
   {'apple':40, 'grapes':65, 'strawberryies':89

Note :apple=40 : equal sign makes key = value by compiler.

example 2:
---------
def cart(first, last, *ages, **items):
  print first
  print last
  print ages
  print items


cart('muni', 'sekhar', 22,33,44,55, apple=40, grapes=65, strawberryies=89)

equal sign  makes the compiler to think as dictionary.

output->  
muni
sekhar
(22,33,44,55)  (tuple)
{'apple':40, 'grapes':65, 'strawberryies':89} (dictionary)

==================================
Tuple and Dictionary as parameters
==================================

* (single asterik) is used for tuple
** (double asterik) is used for dictionary.


tuple as paramter:

--------------------------------------
def tupleparameter(a, b,c):
 return a+b*c

sampletuple = (1,2,3)

print tupleparameter(*sampletuple)

Output -> 7

Here a takes value a=1, b=2, c=3
-----------------------------------

dictionary as paramter:
----------------------

def dict(**example):
 print example

sampledict = {'dad':45, 'mom':55, 'sekhar':60}

dict(**sampledict)

===================
CLASSES and SELF
===================
 class contains data members and method.

 In methods the first parameter is "self" followed by parameters,

self
----
 self is the temporary holder for object name. The respective object is stored in self.

class syntax:
-------------
class <classname>:
 

  def method1 (self, x, y):
    statements

  def method2 (self, x, y):
    statements
 

#how to create object.
firstobj = classname()

How to access the method using the object?
-----------------------------------------
firstobj.method1()
firstobj.method2()


--------
example 1:
---------

class firstclass:
 def create(self, name, salary):
    self.name = name
    self.salary=salary

 def display(self):
    print "name : %s and salary: %d" % (self.name, self.salary)

# create object
firstobj= firstclass()
secondobj = firstclass()
firstobj.create('sekhar', 20)
secondobj.create('muni', 10)

firstobj.display()
firstobj.display()

============================
Super Class and Sub Classes
============================

class parentclass:
  var1="method"
  var2 ="methos2"
----------------------------------------
syntax: class derivedclass(parentclass):
----------------------------------------
#derived class
class derivedclass(parentclass):
  pass  (no definition or NULL statement, definition can be written later).


pass keyword:
------------
In Python programming, pass is a null statement. The difference between a comment and pass statement in Python is that, while the interpreter ignores a comment entirely,
pass is not ignored. But nothing happens when it is executed. It results into no operation (NOP).

---------------------
parentobj= parentclass()
print parentobj.var1

derivedobj= derivedclass()
print derivedobj.var1

---------
example :
---------
class parentclass:
  var1="first variable"
  var2="second variable"

class derivedclass(parentclass):
  pass #no definition

parentobj= parentclass()
print parentobj.var1
print parentobj.var2

derivedobj=derivedclass()
print derivedobj.var1
print derivedobj.var2
`

output->
first variable
second variable

first variable
second variable

=====================================
Overwrite Variables in derived class
=====================================
Python provides a flexibity to overwrite variables in the derived class.

class parentclass:
 var1="muni"
 var2="sekhar"

class derived(parentclass):
  var2="reddy"

pobj = parentclass()
print pobj.var1
print pobj.var2

print "derived class"
cobj = derived()
print cobj.var1
print cobj.var2

Output->
muni
sekhar

derived class
muni
reddy


=========================
Multiple Parent Classes
=========================

In python the derived class can inherit the properties from multiple classes.

Suppose if you have two classes  Mom and dad, the derived class (child) can inherit from both classes.


class Mom:
   var1 = "hey i am mom"

class Dad:
   var2 = "hey i am dad"

class child (Mom, Dad):
   var3 = "hey i am child"

momobj = Mom()
dadobj = Dad()
childobj  = child()

print childobj.var1
print childobj.var2
print childobj.var3


Output->
hey i am mom
hey i am dad
hey i am child


===============
Constructors
===============
Constructor is used to intialise the object data members of a class.

Construtor is called when object is created for class.
--------------------------------------------------------
syntax for the constructor
==========================
def __init__(self):

--------------------------------------------------------

class parentclass:

  def __init__(self):
    print "constructor is called"
    print "constructor is called when object is created"

pobj= parentclass()

Output->
constructor is called
constructor is called when object is created

===============
Import Modules
===============

python import the modules using the keyword called "import"

syntax:
-------

import <filename>

-> How to Access:

filename.<function>()


example :
---------

Just a sample file "testmodule.py"

testmodule.py
--------------
def testmod():
  print " I am in testmodule"

sample.py
----------
import testmodule   >>> Import the testmodule

testmodule.testmod()


Output->
I am in testmodule


===============
reload Modules
===============

"reload" is the keyword which can be reload the module.
Used if there are any modification done on the module.

example:
--------

Just a sample file "testmodule.py"

testmodule.py
--------------
def testmod():
  print " I am in testmodule"

sample.py
----------
import testmodule   >>> Import the testmodule

testmodule.testmod()

samplevariable= testmodule.testmod

samplevariable()

Note: The testmodule.testmod can be stored in the normal variable and can be called.


In case if we modify ->

testmodule.py
--------------
def testmod():
  print " I am in sample module"

then calling function of testmodule.testmod() print the old data as "I am in testmodule"

Then how to reflect the changes in the sample.py file.

Just you need to  use "reload(testmodule)"

----------------------------------
import testmodule   >>> Import the testmodule

testmodule.testmod()

reload(testmodule)

testmodule.testmod()


Output->
I am in testmodule
I am in sample module

====================
GETTING MODULE INFO
====================
==================================
How to get the module information
==================================

import math

dir(math) -> It gives information about the modules present
under the math.


['__doc__', 'acos', 'asin', 'fabs' ..... ]

help(math) -> Describe about each module.


The builtin function can be accessed using the "math.cos"

===================
WORKING with FILES
===================

python supports the file operations as similar to C language.


keywords: open, write, read, close.
---------

syntax for writing in to file:
------------------------------
fileObject= open('c:/test.txt', 'w')  // Here 'w' (write) or 'r' (read)

fileObject.write("Hey Muni i am here")

fileObject.close()


syntax for reading from the file:
---------------------------------

fileObject= open('c:/test.txt', 'r')  // Here 'w' (write) or 'r' (read)

fileObject.read()
fileObject.close()


Output ->
Hey Muni I am here

fileObject.read(3)

Output -> Hey
---------------------------------------
How to read and write line in files
---------------------------------------
using keyword line by line -> "readline() and writeline()"

-> To read all Lines
           - > readlines() and writelines()

--------
example:
--------

Write
-----

fobj= open('/home/test/test.txt', 'w')
fobj.write("muni sekhar reddy")
fobj.close()

write and read
--------------

fobj= open('/home/test/test.txt', 'w')
fobj.write("muni sekhar reddy")
fobj.close()


fobj= open('/home/test/test.txt', 'r')
print fobj.read()
fobj.close()

readline
--------
fobj= open('/home/test/test.txt', 'w')
fobj.write("muni sekhar reddy \n I love you \n")
fobj.close()

fobj= open('/home/test/test.txt', 'r')
print fobj.readline()
fobj.close()


Output->

muni sekhar reddy
I love you

----------------------------------------------------
readlines   -> Reads all Lines and display as a list
----------
fobj= open('/home/test/test.txt', 'w')
fobj.write("muni sekhar reddy \n I love you \n")
fobj.close()

fobj= open('/home/test/test.txt', 'r')
print fobj.readlines()
fobj.close()

Output-> displays list.

['muni sekhar reddy \n', ' I love you \n']
-----------------------------
How to modify the file lines
-----------------------------

fobj= open('/home/test/test.txt', 'w')
fobj.write("muni sekhar reddy \n I love you \n")
fobj.close()

fobj= open('/home/test/test.txt', 'r')
listme= fobj.readlines()
fobj.close()

print listme

listme[1] = "sekhar reddy"

Now change the second line using..

fob= open('/home/test/test.txt', 'w')
fob.writelines(listme)
fob.close()

The list of lines are stored in the file. using writelines.


==============================================================================
Miscellanous and Advance concepts
==============================================================================

For loop with in a list notation  -> This is also called list comprehension.
=================================

syntax:

listme = [<variable> for i in range(10)]

This can be written as

example
-------
listme = []
listme= [ i for i in range(10,20)]
print listme


output->
[10,11,12,13,14,15,16,17,18,19]


The same can be represented as:->
-----------------------------------
listme=[]
for i in range(10,20):
 listme.append(i)
-----------------------------------

Other examples of list comprehension
--------------------

example:4
---------
data = ['3', '7.4', '8.2']
new_data = [float(n) for n in data]

Output->
[3.0, 7.4, 8.2]


example 5:
---------
myList = []
for i in range(10):
    if i%2 == 0:     # could be written as "if not i%2" more tersely
       myList.append(i)

The above condition can be comprehensed as

mylist = [i for i in range(10) if i%2==0]

Note:
-----
You can have "nested" list comrehensions, but they quickly become hard to comprehend
List comprehension will run faster than the equivalent for-loop,
and therefore is often a favorite with regular Python programmers who are concerned about efficiency


====================================================
How to start the Python program Using Main function
====================================================
--------
syntax 1:  main definition can be called as below.
--------

def main():
   print " I am in the Main function "

if __name__ == "__main__"
   main() // Call the main function here.

---------
syntax 2:
---------

def main(argv)
   print " I am in the main function with the arguments "

if __name__ == "__main__"
   main()  //Call the main function with arguments.

============================
Enumerate Keyword in Python
============================
enumerate keyword adds counter to the variable.
The enumerate() function adds a counter to an iterable.

example 1:

  for i in range(5)
    print i

Output -> 0, 1,2,3,4


example Using enumerate:
------------------------

  for count, i in enumerate(range(5))
    print count,i

Output -> count: 0,1,2,3,4  i => 0, 1,2,3,4

example Using List:
------------------------

By default enumeration starts from zero.


elementList = ['foo' , 'bar', 'baz']

for count, element in enumerate(elementlist)
  print count, element

Output-> rowindex, row value
0 foo
1 bar
2 baz

example Using List:
------------------------

elementList = ['foo' , 'bar', 'baz']

Enumeration starts from 43.


for count, element in enumerate(elementlist , 43)
  print count, element

Output->

43 foo
44 bar
45 baz


Example of List comprehension
=============================
t1=[1,2,'Hello',(1,2),999,1.23]
t2=[1,'Hello',(1,2),999]

t3=[]

for it1, e1 in enumerate(t1):
    for it2, e2 in enumerate(t2):
        if e1==e2:
            t3.append((it1,it2,e1))


(Or)

This can be optimised with list comprehension as

t3 = [(it1,it2, e1) for it1, e1 in enumerate(t1) for it2, e2 in enumerate(t2) if e1==e2]

========================
Iterables vs Generators
========================

Iterables

When you create a list, you can read its items one by one, and it’s called iteration:

>>> mylist = [1, 2, 3]
>>> for i in mylist:
...    print(i)
1
2
3

Mylist is an iterable. When you use a list comprehension, you create a list, and so an iterable:

>>> mylist = [x*x for x in range(3)]
>>> for i in mylist:
...    print(i)
0
1
4

Everything you can use “for… in…” on is an iterable: lists, strings, files…
These iterables are handy because you can read them as much as you wish,
but you store all the values in memory and it’s not always what you want when you have a lot of values.
Generators

Generators are iterators, but you can only iterate over them once.
It’s because they do not store all the values in memory, they generate the values on the fly:

>>> mygenerator = (x*x for x in range(3))
>>> for i in mygenerator:
...    print(i)
0
1
4

It is just the same except you used () instead of [].
BUT, you can not perform for i in mygenerator a second time since generators can only be used once:
they calculate 0, then forget about it and calculate 1, and end calculating 4, one by one.

=======
Yield
=======
Yield is a keyword that is used like return, except the function will return a generator.

>>> def createGenerator():
...    mylist = range(3)
...    for i in mylist:
...        yield i*i
...
>>> mygenerator = createGenerator() # create a generator
>>> print(mygenerator) # mygenerator is an object!
<generator object createGenerator at 0xb7555c34>
>>> for i in mygenerator:
...     print(i)
0
1
4

Here it’s a useless example, but it’s handy when you know your function
will return a huge set of values that you will only need to read once.

To master yield, you must understand that when you call the function,
the code you have written in the function body does not run.
The function only returns the generator object, this is a bit tricky :-)

=============================
Virtual functions in Python:
============================

By defualt all functions are virtual in python.

class parent:
  def hello(self):
     print " I am in class parent"

class child(parent):
  def hello(self):
     print " I am in child class"


def main():

  childobj = child()
  childobj.hello()

if __name__ == "__main__":
   main()


Output->

 I am in child class.


========================
Lists in the Dictionary
=========================


def main():
  list_sample = [1,2,3,4,5]

  print "the list len %d" % len(list_sample)

  dict_sample = {1: ['A', 'B'], 2:['D','E', 'F'], 3:['S', 'G', 'K']}

  dict_sample[2].append('Z')

  for items in dict_sample:
    flag=1
    for val in dict_sample[items]:
      if flag==1:
         print "if argv[%d] == val %s" % (items, val)
         flag+=1
      elif flag <len(dict_sample[items]):
           print "else if argv[%d] == val[%s]" % (items, val)
           flag+=1
      else:
           print "else  argv[%d]== %s" % (items, val)

                                                           
=============
Python Class
=============
-------------------------------------------------
Basic syntax of class : class base(object)

Constructor :  def __init__(self)

All methods should have one parameter:  self.

void display(self)
-------------------------------------------------
---------------
Class Example
---------------

class base(object):
  def __init__(self, name):
    self.name = name
    print "I am in the constructor"

  def display(self):
    print "The Name" +" " + self.name

def main():
  ob = base('muni')
  ob.display()

if __name__ == '__main__':
  main()

------------
Inheritance
------------

class base(object):
  def __init__(self, name):
    print " I am in constructor"
    self.name = name

  def display(self):
    print "I am in base class" +" " + self.name

class derived(base):
  def __init__(self, name):
    print " I am in derived"
    self.name = name

  def display(self):
    print "I am in derived class" + " "+ self.name

def main():
  ob = base("muni")
  ob.display()

  der = derived("sekhar")
  der.display()

if __name__=='__main__':
  main()


Note: Base class constructors can't be inherited in the derived class.

Output:
I am in constructor
I am in base class muni
I am in constructor
I am in derived class sekhar

-----------------------
Class Scope Variables:
-----------------------
The Variables declared outside of the methods is accessible to every object.
Same memory is shared across all the objects (Like static variable in C++)

class base(object):
 name = "Nipom"

def main():

  ob = base()
  base.name = "Reddy"
  ob1 = base()
  print ob1.name
  print ob.name
if __name__=='__main__':
  main()

Note:  The Class scope variable is modified by the "class name.<Variable> "
-----
If it is modified by the object, it will be reflected only to the object.

Output:

 Reddy
 Reddy
--------------
Example 3:
==============

class Dog:

    tricks = []             # mistaken use of a class variable

    def __init__(self, name):
        self.name = name

    def add_trick(self, trick):
        self.tricks.append(trick)

>>> d = Dog('Fido')
>>> e = Dog('Buddy')
>>> d.add_trick('roll over')

-----------
Example 4
-----------

class Dog:

    def __init__(self, name):
        self.name = name
        self.tricks = []    # creates a new empty list for each dog

    def add_trick(self, trick):
        self.tricks.append(trick)

>>> d = Dog('Fido')
>>> e = Dog('Buddy')
>>> d.add_trick('roll over')
>>> e.add_trick('play dead')
>>> d.tricks
['roll over']
>>> e.tricks
['play dead']
>>> e.add_trick('play dead')
>>> d.tricks                # unexpectedly shared by all dogs
['roll over', 'play dead']